TMJ-Mobile Map Creation/Conversion
One of the main functions of TMJ-Mobile is its ability to overlay your track, waypoints and location on a map saved on the phones memory card. These maps need be stored in the TMJ file format, which is created using the TMJ-MapOrganiser utility. It can either convert existing JPEG and PNG map image files (in Rectangular or Mercator projection) into the TMJ format, or can download map tiles from OpenStreetMap for assembling into a map file (the individual tiles can also be transferred to the phones memory card for use as a 'zoom/column/row' tilestore within TMJ).
TMJ-MapOrganiser Usage Notes
Download
Please Log-in to your TrackMyJourney account then return to this page to download this utility.
Instructions
Converting PNG and JPEG Images to Map Files
Use File/Open Image File... to load a JPEG or PNG map image file. The map should be in either Rectangular/Equirectangular or Mercator projection (see notes on projections below).
In the Bottom/Top/Left/Right boxes enter the coordinates of the extents of the map. Coordinates should be entered in decimal form, North and East positive, South and West negative, with a period (.) as the decimal separator (eg: 51.25673 etc). If the map is in a rectangular projection but the exact extents are not known, then the Tools/Calculate Bounds function can be used to calculate the extents by interpolating from two precisely known points within the map.
If the original map image uses the Mercator Projection then use the Tools/Convert from Mercator Projection to convert it to the rectangular projection required by TMJ-Mobile. (Ensure that the Latitude Bounds are correctly entered before using this function). Note that this will slightly distort the map along the Y-axis, but will ensure that it aligns correctly when displayed on the phone.
The utility breaks the map up into smaller tiles which are more easily handled by TMJ-Mobile. Enter the Width and Height of each tile. This should always be greater than or equal to the screen resolution of your mobile phone. (Usually 120x160, 176x220, 240x320, 360x480, etc). If it is set too large then TMJ-Mobile might have trouble holding each tile in memory (at any one time it needs to keep 4 tiles in memory). Generally the default tile size of 320x320 pixels should be fine. For phones that automatically switch between portrait and landscape the tile width/heigh should both be at least as large as the largest side (eg for BlackBerry Torch use 480x480 tiles, etc).
If you want to be able to zoom out of the map on the phone, select one or more zoom levels from the list (Ctrl-click the items to select multiple zoom levels).
If you have selected multiple zoom levels you may find that the smaller zoom levels appear a bit feint or blurred on the phone. This has been improved in v2.6 by using a customised (though slower) resampling method, but if you would prefer to create the smaller zoom levels manually, untick the 'Automatic Image Resizing' box. When the program creates the TMJ file it will firstly chop up the source image into individual tiles and will then display a message prompting for the tiles to be resized. You should then open the tiles in an image editing program and manually resize them to the selected Tile size. Note that IrfanView has a good batch-processing function which allows this process to be semi-automated, including applying sharpening, contrast, brightness and colour-palette optimisations.
To further reduce the output filesize and speed up map loading/display on the phone the 'Force 256 Colour Palette' can be used to reduce the number of colours in the output file. Note that these palettes are optimised for OpenStreetMap maps created via the Tile Server window - results may vary when using maps from other sources.
Use File/Save TMJ File As... to generate the final TMJ file. The utility saves the individual tiles to disk then combines them into a single TMJ file. For large maps this process can take a while - just give it time!
Transfer the TMJ file to your phones memory card, then in TMJ-Mobile go to the Map page (press 6) then use the Context Menu/Raster Map Source/Offline/Open TMJ Map File function to select the map file.
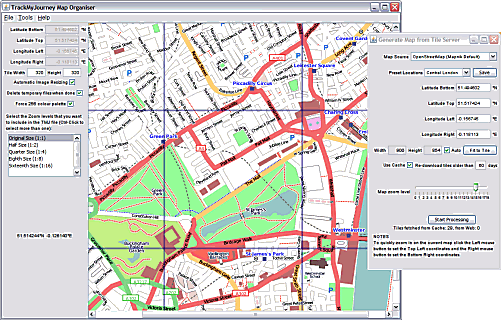
Downloading Maps from OpenStreetMap
Use the File/Create Map from Tile Server menu option to bring up the OpenStreetMap dialog.
Select a Map Source to define the map rendering style.
Enter the Bottom/Top/Left/Right coordinates of the map to be downloaded from OpenStreetMap or select one of the preset locations. If a map already exists in the main window you can Left-Click/Right-Click to set the Top-Left/Bottom-Right coordinates respectively.
Set the required pixel Width/Height for the map or leave the Auto box ticked to have the map set to the optimum size.
The 'Fit to Tile' button adjusts both the lat/long extents and width/height values to fit the map to the current tile size, reducing any wasted borders around the map.
The 'Use Cache' option keeps a store of the downloaded tiles on the local computer to avoid having to re-download the tiles each time the view is adjusted, saving time and bandwidth and reducing the load on the OSM servers.
Drag the zoom slider to select the map 'scale'. Note that at higher zoom levels the map size can become very large - the map extents may need to be reduced to prevent it becoming unmanagable.
Click the Start Processing button to begin the map download.
Once the map has been assembled follow the above procedure (from Step 4 onwards) to generate the TMJ File.
Using the Downloaded Map Cache
When downloading maps from OpenStreetMap the map tiles are saved into a local cache folder (created in the same location as the TMJ-MapOrganiser JAR file). Tiles are stored in subfolders in the format style/zoomlevel/columnnumber/rownumber.png, which is then same folder structure used by many online map providers (OpenStreetMap-based ones in particular). By transferring the zoomlevel folder and its contents onto the phones memory card this can then be read directly in TMJ via the Context Menu/Raster Map Source/Offline/Select zcr Folder function.
(Note that this will only work correctly on phones which allow full unrestricted access to the memory card. This includes BlackBerry and Sony Ericsson JP8 phones, though not Nokia unfortunately)
Notes
If you are using very large maps you may need to run the 'Start Map Organiser (1GB)' file, which allocates the program more memory for image storage.
Use only JPEG or PNG files. If using PNG files ensure that they are in 8-bit 'indexed-colour' format.
Thanks to Andy Allan for allowing tile downloads from his excellent OSM-based OpenCycleMap and also thanks to CloudMade for access to their tileserver and Mobile-optimised/No-names OSM rendering styles.
TMJ Map Merger Utility
This small utility can be used to merge and rearrange the 'layers' from one or more TMJ map files together to form one large file. Each map layer is displayed on the Map page of TMJ-Mobile using the [#/*] keys or via the context menu. The utility is included in the MapOrganiser download and can either be started manually or via the Map Organiser Tools menu.
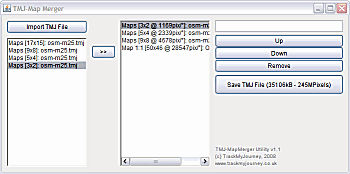
Click the Import TMJ File button to open the first file for merging. A list of the layers/zoom levels in the file is displayed on the left side.
Select a layer/zoom level and click the >> button to add it to the output layer list, shown on the right-hand side.
Repeat the above steps until the required layers are listed in the output list.
Rearrange the layers using the Up/Down buttons and rename them as necessary. Note that the top item in the list is the first layer that will be displayed when the map is opened in TMJ-Mobile. It is recommended that the layers are ordered such that the most detailed layer is at the top of the list and the least detailed at the bottom.
Click the Save TMJ File button to export the merged file.
Some Further Notes on Map Projections...
Since the shape of the Earth more-or-less equates to a slightly squashed sphere, it is mathematically impossible to translate its 3-dimensional surface onto a 2-dimensional map (or phone screen!) without suffering some form of distortion. Various map projections have been invented that use different methods for translating a latitude/longitude to a point on a 2D surface, with each projection usually being designed to minimise distortion over a particular region (hence the national mapping agencies of individual countries usually use different projections customised for their own location).
These projections often involve extremely complex conversion formulae, which is both difficult to code and slow to process on a mobile phone (for example see the appendices at the end of this document from UK Ordnance Survey for some nice equations!). Therefore to simplify matters the TMJ map format solely uses a Rectangular projection. This is a very simple projection whereby the x-axis maps linearly to longitude, and the y-axis maps linearly to latitude (though the two axes can use different scaling factors to reduce distortion at higher latitudes, so it is more flexible than an Equirectangular projection). This allows for very fast overlay plotting on the phone, since the calculations required to map a latitude and longitude to a screen pixel are very straightforward. Local distortions are relatively minimal for small maps covering less than 1 or 2 degrees latitude, though larger coverage areas (eg continent-size) do suffer somewhat from area distortions.
The difficulties arise when trying to calibrate maps for use in TMJ that are in different projections other than rectangular. Unfortunately without some complex image-distortion algorithms this is likely to be rather hit-and-miss, depending on the projections concerned. The MapOrganiser is able to convert from regular Mercator projection, as used on most online 'slippy' map services (though note that this is very different from the UTM projection, often used in European printed maps). There is also the separate OSConverter for converting maps from UK National Grid projection. At some point we'd like to extend the OS Converter to include other generic UTM projections (the UK National Grid is simply a specific type of UTM projection), but for the moment the calibration in MapOrganiser can result in localised errors when displaying non-compatible projections in TMJ.