TMJ-Mobile User Guide
Version v0.8.5
![]() Download this Guide in PDF format
Download this Guide in PDF format
Phone Keypad
Since individual phone models have different keypad layouts there may be differences between the key names used in this guide and the keys available on your phone. The key names used in this guide equate to the following keys on the Sony Ericsson W800i:
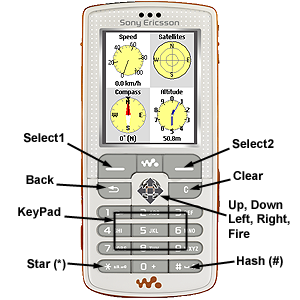
The actual keys used on your device may be different to this but by trying each one in turn it should become apparent which is which. The [Select1] key is used to bring up the Main Menu and activate menu items. The [Select2] key brings up a Context-Sensitive Menu on certain screens. It is also used to close the menu without selecting an option. The number keys [1]-[9] are used to change the currently displayed page. The remaining keys have different uses depending on the currently displayed page, detailed later in this guide.
The [Back] key is not present on all phones, but its main use is to come out of Menus/Screen Prompts, and can often be mimicked using the [Left] key.
Touch-Screen Phones
|
|
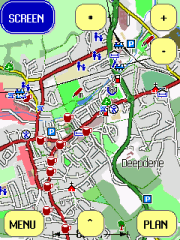
TMJ-Mobile supports full touch-screen control of all functions. The screen has several hidden 'virtual' buttons around its edge, whose locations should quickly become familiar. Some buttons vary depending which screen is being displayed, but the four main buttons are the same on all: SCREEN (top-left corner) is used to select the current screen. MENU (bottom-left corner) brings up the Main Menu (same as the SELECT1 key). CONTEXT-MENU (bottom-right corner) brings up the current screen's context menu (same as the SELECT2 key). SHORTCUT-MENU (bottom-centre) displays the standard shortcut menu. By keeping a finger pressed on any button, after a couple of seconds all the other available buttons will become highlighted so their location can be noted. Some screens also support dragging, eg panning the map and scrolling through menus and lists. Other functions are as follows:
NOTE: The touchscreen functions have been designed and tested on Nokia 5800 and BlackBerry Torch 9800 phones, so usage/responsiveness on other touch-screen phones may vary. If the buttons and menus are too small to be easily selected with a finger tap, the Menu/Settings/Other Settings/Menu Font Size option can be used to increase the size of the menus and buttons. |
Notes on BlackBerry Handsets
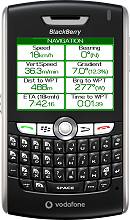 |
Since BlackBerry handsets use a different menu system from 'normal' phones, operation of TMJ-Mobile works slightly differently. The BlackBerry MENU button brings up the BlackBerry Menu in the usual way (in the BlackBerry style), but further menu screens are then displayed using the TMJ-Mobile menu system, which provide Check-Boxes, Selection Lists and other items not available in the standard BlackBerry menu. Also, the BlackBerry BACK button is mapped to the [Select2] key, allowing quick access to the TMJ Context Menu. Though is slightly unconventional (compared with other BlackBerry apps) it works quite well once you get used to it, but if preferred can be disabled via the Settings menu. Other key mappings are as follows:
|
Screens
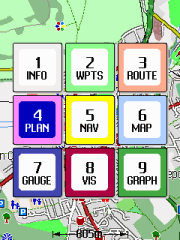
There are nine main screens in TMJ-Mobile, which are accessed via the [1]-[9] keys on the phones number pad. Pages [1] and [7] have further subpages, which are accessed by repeatedly pressing the number key or via the [Left] and [Right] keys. The main pages are as follows:
-
Text Information page
-
Waypoints list
-
Route page
-
Plan View
-
Navigation View
-
Map View
-
Gauges page
-
Track Visualisation View
-
Graphs page
Terminology
Some of the terms used within TMJ-Mobile might be unfamiliar, or differ slightly from other software:
-
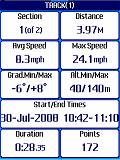
TRACK - this is the actual path recorded from the GPS device and shows where you have been. It is made up of one or more TRACK SECTIONS, each containing a number of TRACK POINTS. A new Section is started: 1) each time TMJ-Mobile is run, 2) when stationary for a preset time, or 3) Manually via the Tools menu.
-
ROUTE - this is a user-defined path which tells TMJ-Mobile where you want to go. A route can be constructed on the phone by adding ROUTE POINTS on the Plan or Map pages, or by downloading and converting an existing TRACK from the TrackMyJourney website.
-
WAYPOINT - this is a named location, defined by a Latitude and Longitude, eg a particular railway station, school, office, place of interest, road junction, etc. Waypoints can be added on the phone or on the Website. The two sets are synchronised together via the TMJ-Mobile Web/Update Waypoints menu. Note that a Waypoint has to be deleted from both the phone and the website to remove it completely.
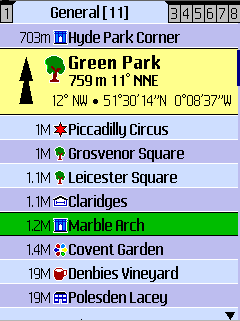
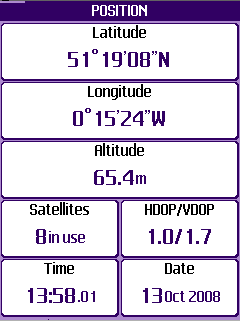
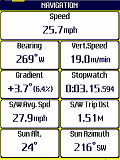
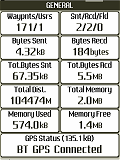
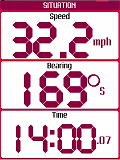
Text Information Page [1] |
|
|
|
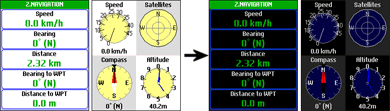
Shows text readouts of various parameters and statistics. Press [left/right] or [Select2] to switch between subpages:
NOTE: Where an item is surrounded by curly brackets {} the value shown is the last-known 'good' value, eg if the GPS device loses its fix or is switched off, etc. * For phones using an internal GPS this information is not always available. ** Calories are calculated using the formula: kcal = MET * weight(kg) * time(hrs), where MET is the 'average' metabolic rate (per kg) burned when performing the associated activity at the calculated speed. (So running faster has a higher MET value, and hence higher calorie burn per second). *** Area is calculated assuming the Earth to be a perfect sphere, is only accurate for smallish areas and is intended as a guide only. The calculation is only valid for non-intersecting track sections (where the track doesn't cross over itself); for each section the start and end points are joined to form a polygon, and the area calculated using this formula.
|
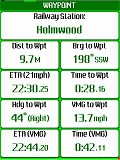
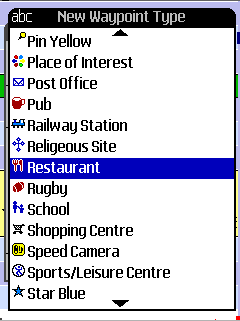
Waypoints Page [2] |
|
|
Shows a list of Waypoints, either downloaded from the TrackMyJourney website or entered manually into the phone, along with any 'Live' users who are linked to your TMJ account. Each Waypoint has a Name, Location (Latitude/Longitude), Type (eg Station, Hospital, School, Pub, etc), Description and Group. The Waypoints are displayed in separate tabs for each Waypoint Group, which allow similar waypoints to be arranged into categories. For example you might have groups such as 'Work Related', 'France Holiday', 'General', 'Temporary', etc. Group names can be changed via your Account/SETTINGS page on the website.
Waypoints Context-Sensitive Menu
|
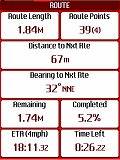
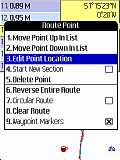
Route Page [3] |
|
|
|
Shows the current Route as a list of route points and a plan view.
Route Page Context-Sensitive Menu
When there is no route currently loaded the menu displays just two options:
|
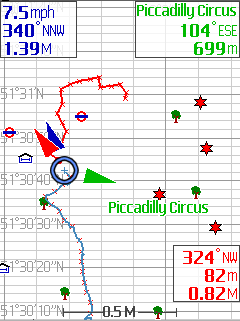
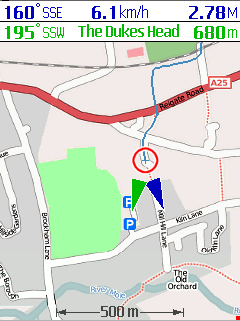
Plan Page [4] |
|
 |
(The Plan Page can also display Vector Maps, as detailed later in the Vector Maps guide) Shows a plan of the current track, location, waypoints and any 'live' users.
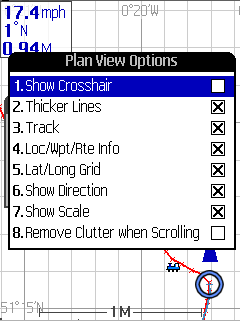
Plan Context-Sensitive Menu (also applies to Map page)
|
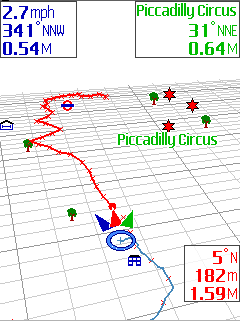
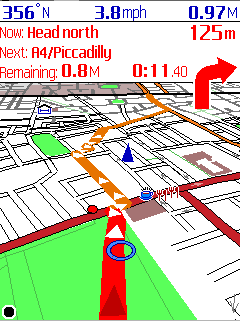
Navigation Page [5] |
|
|
|
Shows a 3D view of the track, centred at the current location.
Navigation Page Context MenuSimilar to the context menu for the Plan page (see above) with a couple of new options:
|
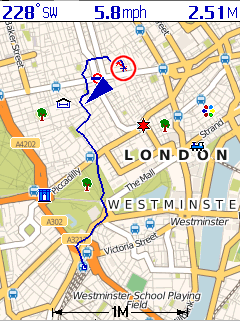
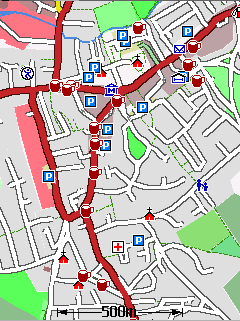
Raster Map Page [6] |
|
|
|
Shows similar information as the Plan page but overlaid over a raster map of the area. Maps can either be stored locally on the phones memory card (stored within a single file created using the TMJ-MapOrganiser, or in a folder structure of Mercator tiles), or downloaded live from the internet.
Map Context-Sensitive MenuAlmost the same as the context menu for the Plan page (see above), with a couple of small differences:
The View Options/AutoPan item is simplified, with three options:
The Re-Calibrate Map option aligns the map so that the current GPS location is aligned to the point currently at the centre of the map display. This can be useful if a map has not been perfectly calibrated, which is particularly noticeable with map files that cover a very large area. Note this is not an alternative to properly calibrating a map in the first place (using the PC-based Map Organiser). |
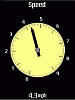
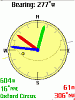
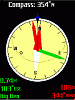
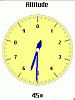
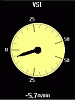
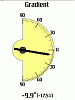
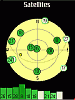
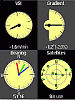
Gauges Page [7] |
|
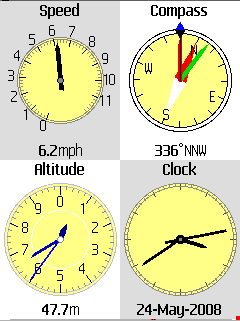 |
Displays various 'analogue' gauges, with either 1 or 4 gauges per page (6 per page on Landscape Screens). Use [left/right] to cycle through the full-screen gauges, and [up/down] to cycle through the thumbnail gauges. The [fire] key switches between a light and dark background, making the gauges easier to see in different lighting conditions. The Gauges Context Menu has just two options:
|
Track Visualisation [8] |
|
 |
A cross between the Plan and Navigation pages, this view allows the track to be re-examined and replayed in both 2D and 3D. There are a number of different modes which can be set to control how the view is displayed.
Viewing modes:
Visualisation Page Context-Sensitive MenuThis is similar to the Navigation page menu (above), with a few additions:
|


Graphs Page [9] |
|
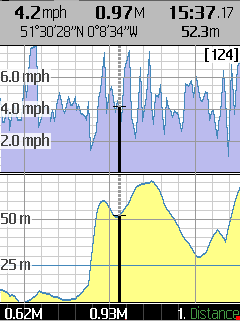 |
Shows a Speed and an Altitude graph for the current track and allows for basic examination of individual trackpoints.
Graph Page Context-Sensitive Menu
|
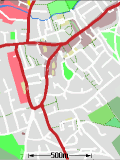
Vector Maps
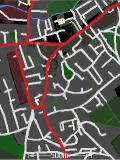
The Plan, Route, Visualisation and Navigation screens in TMJ-Mobile can each display a Vector Map background, sourced from OSM data. Vector Maps are significantly more versatile than raster maps, since they contain the individual components needed to draw the map from scratch, including embedded meta-data (eg Road and Place Names), allowing the map to be dynamically searched. Being vector-based they can be easily rotated or plotted in 3D, with an added benefit that they are often smaller in filesize than raster maps (sometimes by as much as 10x), which makes them ideally suited to use on a low-memory device such as a phone. The main drawback with Vector Maps is that all the map drawing has to be done by the phone on-the-fly, so older phones (or densely populated areas with lots of map detail) can be slow to render.
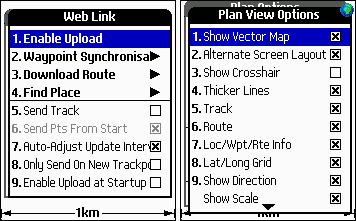
The Vector Maps are downloaded on demand by from the TrackMyJourney webserver, making it easy to grab a map of the current location. To allow TMJ-Mobile to access the internet ensure that Main Menu/Web/Enable Web is activated. The Vector Maps can then be shown/hidden on each screen via the Context Menu/View Options/Show Vector Map option.
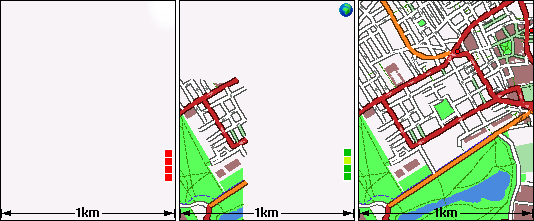
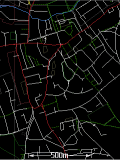
The phone will then attempt to download the maps. It displays 4
map tiles at a time (by default), which are downloaded independently. During
download a set of small squares are shown on the right of the screen, the colour
of each square giving the status of each tile. Red indicates that the tile is
not available or not requested (eg if Enable Web hasn't been set), Lime Green
indicates the tile is currently being downloaded, Medium or Dark Green shows
that the tile has been downloaded and is being prepared for display. A Blue
square indicates that the tile is not currently available on the Tile Server,
but has been scheduled for creation - this should generally only take a minute
or so, but may be longer if the server is under heavy load. (Please note that
the vector maps are still a work-in-progress, so fine-tuning of the
web/tile server may be needed if the tile-request quantity increases
significantly, and may lead to short periods when the maps are unavailable!)
Once downloaded each tile is stored in the phones Map Cache and loaded from
there the next time it is needed. The default cache size of 2Mb is enough to
hold several hundred tiles. When the cache becomes full the least-used tiles are
removed in order to free up space for new ones.
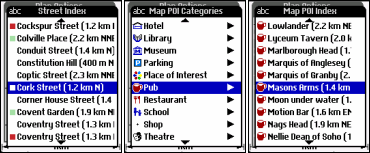
The Street Gazetteer and POIs in the currently loaded map tiles are listed in
the Context Menu/Go To Location/Map Index: Streets and Map Index: POI
menu. These menus also have an option to Sort the list alphabetically by Name or
by Distance from the current location:
The Context Menu/Vector Map Options menu is used to customise the Vector Maps and has four options:
|
|
|
Menus
Main Menu > Display >>
Leads to a sub-menu for controlling general display options:
-
Lock Keypad: Locks the phones keypad to avoid accidental keypresses (eg: if the phone is kept in a pocket). This may be less useful on some handsets which do not allow all the keys to be locked. Once locked, press [*] then [Select1] to unlock the keypad.
-
Start Slideshow: Automatically cycles between the different screens, changing the current page every few seconds. Can be useful if the phone is mounted on a bikes handlebars, for example. The slideshow stops the next time a key is pressed.
-
Backlight On: Forces the phone to keep the backlight on permanently (or for an extended period of time). Option may not available on all handsets. Note that leaving the backlight on will reduce your battery life so use sparingly!
-
Night Colours: Uses an inverted, darker colour scheme to reduce glare from the screen when used in low-light conditions.
-
Auto Night Colours: Automatically switches to Night Colours when the Suns Altitude drops below -4�.
-
Auto Keylock: When selected will automatically lock the keypad when no key is pressed for at least 30 seconds.
-
Screen Update Frequency: Sets how often the screen is redrawn. If using a GPS with a higher than 1Hz update this can be used to give a much smoother scrolling view. Note that some phones may not be powerful enough to get the full benefit of this option.
-
Configure Slideshow: Leads to a submenu for selecting which pages should be displayed in the slideshow, and an option to set the page change frequency.
-
Select Screen: allows a particular screen to be selected (equivalent to pressing the dedicated numeric key for each screen).
Main Menu > GPS >>
Leads to a sub-menu for managing the GPS device connection:
-
Depending on whether your phone has an Internal GPS (and you have enabled this option via the Settings screen), shows either:
- Bluetooth GPS/Disconnect GPS: Displays a new menu with a Search for BT-GPS options and a list of recently-connected devices. Once a device is connected, this option will change to 'Disconnect GPS' to allow the device to be disconnected. NOTE: Occasionally the phone might not find your GPS Device on the first attempt. If this is the case use the Refresh menu option in the Search List to start the search again. You may need to do this a couple of times, but once the device is found it will be stored in the Recently-Used list for quicker access in future.
- Connect Int.GPS/Disconnect: Starts/stops the Internal GPS Device -
Enter Manual Connection URL: For phones with a wired GPS or built-in GPS that acts like an external wired GPS (eg many Windows Mobile devices) this option allows a manual connection URL to be entered to connect to the GPS. This should start with the text "comm:" followed by the communications serial port name to connect to, eg: comm:COM5. The port name will vary depending on the phone/GPS combination - the available ports are listed in the Main Menu/About... screen. For Sony Ericsson users with an HGE-100 'GPS Enabler' device, the URL should be entered as "comm:AT5".
-
Auto-Connect: When ticked, if a GPS device is successfully connected its details will be stored in memory - the next time the program is run it will attempt to re-connect to the device without having to specifically use the Connect GPS option.
-
Log Options: leads to a submenu to configure whether the GPS signal will be saved to a log file on the phones memory card. The logging runs in the background and is independent of the Track displayed on TMJ itself, so a basic track can be stored in TMJ, with the full raw data still preserved in the log file for future analysis using other offline tools.
-
Log Active: Turns logging on/off. Note that the other options in this menu can only be altered when the logging is not running (or no GPS device is connected)
-
Log Type: selects whether the log should be saved as an NMEA Text file, GPX file, CSV/TXT file, Raw GPS file or No log file. NOTE: the NMEA Log or Raw GPX logs are not advisable if you are using a phone with an Internal GPS (eg: BlackBerry, N95) as these streams are simulated by the phone and often contain non-standard or erroneous data (particularly on BlackBerry phones). The Raw GPX log creates a new GPX <trkpt> for each GPGGA sentence in the NMEA stream. This is useful for creating full-detail logs for importing directly into OpenStreetMap or JOSM.
-
New Log: selects whether a new log should be created Daily, or each time TMJ-Mobile is Started. Daily log files are saved with the name TMJ Log Y-M-D whereas the On Startup option uses the name TMJ Log Y-M-D HHMMSS.
-
Include Cell ID/Signal: Includes information on the current Mobile Cell, Signal strength and Battery level in GPX logs.
-
Log Folder: select the folder location where the log files will be saved.
-
-
GPS Options: Show different options depending on whether you are using a Bluetooth or Internal GPS device. If your phone supports both methods then the first item in the menu allows switching between the two systems. Note that some of these options are unavailable when a GPS device is currently connected.
Internal GPS:
-
Allow Costs (Assisted-GPS): When selected the Internal Java Location API will have the 'Costs Allowed' option set, which enables Assisted-GPS on those phones that support it. This allows the phone to quickly download the satellite location data from the internet rather than having to receive it from the slow satellite data stream, speeding up the time to get an initial fix. (Note that your mobile operator may charge for the internet use).
-
Basic Connection: Uses a simpler method to connection to the internal GPS device. May be needed on some phones that don't appear to connect otherwise.
-
Force 1 Sec Refresh: The frequency of location updates received from the GPS is usually governed by the phones internal settings, however it has been found on some handsets (eg BlackBerry OS6 phones) that the location may then only be updated every 15 or 30 seconds. Ticking this option tries to override these settings to force an update every second.
-
Override GPS Time: (Not shown on all phones) it has been noticed that some phones fail to include a correct timestamp in their GPS data stream. If the time/date is incorrect when the GPS is connected this option will use the phones normal clock to provide location timestamps.
-
Parse NMEA Data if Available: NMEA data is the raw data format used by external bluetooth GPS devices to transmit position information. Some phones with Internal GPS also simulate this data format, providing extra information not otherwise available. However, in testing it seems that many phones use non-standard variations of the NMEA format, so it is not available on all phones and should be disabled if the GPS signal seems to be way off.
Bluetooth GPS:
-
BT Buffer: Sets the amount of data that TMJ reads from the BT device on each cycle. NOTE: These options are mainly for debugging purposes to help troubleshoot BT connection problems on some phones. For normal operation they should be left at their default values.
-
BT Sleep Time: Sets the pause time between each cycle.
-
BT Timeout: Sets the time that TMJ will 'patiently' wait for any data to be received from the GPS, before it resets the connection.
-
Reset to Default: Resets the above values to their defaults.
-
BT/GPS Connection Sounds: When selected the phone will play a sound each time a Bluetooth GPS is connected/disconnected and each time the GPS signal becomes active/inactive.
Other options:
-
Use Speed/Bearing from GPS: Selects whether TMJ-Mobile should calculate the current speed/bearing by working out the difference in location between successive GPS signals, or whether it should use the speed/bearing readings directly provided by the GPS device. Generally the readings provided by the GPS device will seem more responsive, but more jerky and prone to random fluctuations.
-
Apply Extra Altitude Smoothing: Adds a higher amount of filtering/smoothing to the GPS altitude readouts to reduce the 'spikiness' of the recorded track. Note: this is best used when travelling at slow speeds, otherwise the altitude can appear to lag behind its expected profile.
-
-
Pause Track Recording: Stops any new track points from being stored until recording is Unpaused, useful when entering a building or a known area of temporary poor GPS reception. It can be useful to set this option as the Zero key shortcut (Menu/Display/Zero Key) to allow it to be accessed quickly.
-
Auto Un-Pause After ... distance: If enabled, then once a specified distance (set in Menu/Settings) has been reached from when track recording was paused, it will automatically start recording track points again.
-
Show Averaged Location When Paused: If selected then when track recording is paused every GPS fix is averaged into a single location, helping to eliminate errors from the GPS signal. The Averaged Location is shown as a cross on the Plan/Map pages, along with a figure giving the total number of 'fixes' that have been averaged together to determine the new location. During this time any new Waypoints that are created will use this location. Useful for determining a more precise location when stationary.
Main Menu > Web >>
Leads to a sub-menu for controlling communication with the TrackMyJourney website:
-
Enable Web: Turns on location tracking via TrackMyJourney. When activated, the phone will intermittently send its location to the website and will also download the locations of any friends who are also using the service.
-
Waypoint Synchronisation: leads to a further menu for synchronising the Waypoints stored on the phone with your Waypoints list defined on the TrackMyJourney website. Use the Update Waypoints Now function to initiate the synchronisation process and allow the phone will to connect with the website. The Upload Automatically option will automatically upload any New/Edited waypoints on the phone to the TMJ website (when Enable Web is set). Each Waypoint group can use a different synchronisation method, either:
-
No Sync: No Synchronisation will occur for this Waypoint group. This can be useful if there are particular groups that are often imported/exported via the phones file system, or if a particular group is only used for storing waypoints temporarily.
-
Sync All: All Waypoints in this group will be synchronised with the website.
-
Upload Only: New/Modified Waypoints are upload to and stored on the TMJ website, but no waypoints will be downloaded back to the phone.
-
Sync < ...km: Only Waypoints within the specified distance from the current location will be downloaded from the website. Since the phone has limited memory for storing waypoints this can be useful if you have a large list of waypoints (eg Geocaches, Speed Cameras, etc) stored on the website, but only the nearest ones are of interest at a particular time. If the Remove Distant Waypoints option is ticked then during synchronisation any waypoints currently stored on the phone that are further than the specified distance will also be deleted.
Note: if a waypoint is manually deleted from the phone then it will be re-downloaded from the website the next time the Waypoint Synchronisation function is used. To permanently delete a waypoint it should be manually deleted from both the phone and the website. Also note it is not recommended to synchronise Waypoints frequently loaded from the file-system as this can end up creating duplicate waypoints on the website.
-
-
Download Route: Leads to a further menu for downloading a new route to a destination (via Coordinates, Waypoints or Vector Map items). Also has a Web Folders submenu for downloading an existing tracks from your TrackMyJourney website account to the phone for use as a route. Use the Update Route List option to grab the list of available routes from the website. After a few seconds the route names should appear, arranged by folder (as on the website) - selecting a route will then download it from the web, overwriting any existing route on the phone.
NOTE: On this website use the 'Make available to TMJ-Mobile' option (found at the bottom of each Folder list) to select which folders should be made available to the phone. -
Find Place: leads to a submenu to search online for a point-of-interest, street, place, etc. Geocoding and Routing services are provided by CloudMade
-
Transmit Interval (secs): Enter the number of seconds between consecutive location uploads to the TrackMyJourney website. A small value (eg 15 seconds) will send more accurate data but at the expense of extra data transfer.
-
Send Track: If this option is selected, TMJ-Mobile will send the complete track to the TrackMyJourney website as well as the current live location. If disabled then only the live location will be sent to the website (ie your tracks will not be recorded on the site).
-
Send Points From Start: If this option is selected, when Enable Web is first activated (during each session) it will send all trackpoints currently in the track, otherwise it will only send new trackpoints starting from the current location.
-
Auto-Adjust Update Interval: Selecting this option allows TMJ-Mobile to automatically increase the frequency that it sends its location to the website when a live user is selected on the waypoints page. It activates under the following scenario: two people are using TMJ-Mobile to locate each other; each one has selected the other person on their waypoints page; they get within 1km of each other. TMJ-Mobile will then reduce the time between subsequent uploads so that the location of each user is updated more regularly on each others handset, reducing the chance that the people will walk straight past each other!
-
Only Send On New Trackpoint: When enabled then TMJ-Mobile will only transmit its location if any new Trackpoints have been added since the previous transmission. This results in less data overall being sent/received to/from the website, potentially reducing mobile costs. Essentially it prevents any data from being sent when the phone is stationary. (NOTE: This option should not be enabled if you are using TMJ-Mobile to track a friends location, since it will prevent the friends location from being updated on the handset, unless you are moving as well).
-
Enable Web at Start: When selected the Web Upload function will automatically start each time TMJ-Mobile is run.
-
OpenCellID.org Options: leads to a submenu for configuring OpenCellID options. (Only available on certain handsets that allow the Cell ID to be extracted, in particular recent Sony Ericsson and BlackBerry phones. It is not available on Nokia phones)
-
Send Location/Cell Info to OpenCellID.org: If enabled then your current location and mobile cell info (a unique code that identifies the transmitter that the phone is currently communicating with) will be uploaded and stored on the TMJ website and periodically submitted to OpenCellID in order to improve their freely available Cell Location database. This will then help others without a GPS device who are 'talking' to the same transmitter to get a rough location (see next option). Please note that all data is anonymised - all that is stored is Latitude, Longitude and Cell ID. If you are not happy submitting this data please do not use this function!
-
Get Location from OpenCellID.org: If you don't have a GPS device then enabling this option will attempt to guess your rough location by looking up the position of the transmitter that the phone is communicating with. Note that the OpenCellID database is not fully complete so this option won't work for all transmitters. You can help the project by ticking the 'Send Location' box!
-
Note: When using these options the phone will probably prompt for permission to connect to the Internet. If this permission is not granted then TMJ-Mobile will be blocked from connecting to the internet during the rest of the session (so will need to be restarted again to enable the web features).
Please note that although the amount of data that TMJ-Mobile uses to communicate with the TrackMyJourney website is relatively small, over a period of time this can add up, especially when downloading the online Raster and Vector maps. The rate will depend on your mobile provider - you may have some free data transfer included in your package, in which case TMJ-Mobile shouldn't cost too much to run. However if you are on a Pay-As-You-Go or similar package you should monitor your phone bill to keep a check on your spending. Also be aware that if you use data access abroad ('roaming'), this is often significantly more expensive than the home rate.
For minimal data transfer use the following options: Send Track: Off (if you don't want your tracks uploaded to the website), Send Pts From Start: Off, Settings/Other Settings/TMJ Transmit Interval: 5 minutes or longer.
Main Menu > Tools >>
Leads to a sub-menu with further miscellaneous functions:
-
Simplify Track: Reduces the number of points in the current track to save memory, speed up the application loading time and improve responsiveness of the plan and map displays. This works by removing points which lie unnecessarily close to each other, and those that lie on a straight line.
-
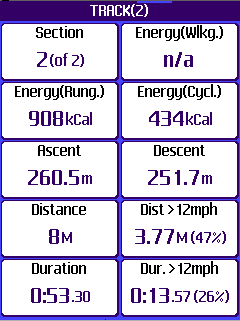
Merge Sections: Leads to a submenu to allow consecutive track sections to be merged together (not available if there is only a single section in the current track). Also contains a submenu item Start New Track Section, which forces a new track section (or lap) to be started. Statistics for each track section are available via the TRACK Information page.
-
Speed Limits: Allows a minimum and/or maximum speed to be set. There are two speed limit Alert Types: Single or Continuous. If Single is selected then when the respective Speed Limit threshold is crossed an alert message will be displayed. It will display at most once every 15 seconds (even if the threshold has been crossed again) to prevent the alerts from becoming too intrusive. If the Continuous Alert Type is selected then a tone is played every few seconds whenever the respective speed limit is exceeded.
-
Waypoint Tools: leads to a submenu with various waypoint-related functions:
-
Select Nearest Waypoint: Selects the nearest waypoint to the current location.
-
Nearest Waypoint Groups: Menu for selecting which waypoint groups are included in the 'Select Nearest Waypoint' function.
-
Waypoint Reached Action: When the selected waypoint becomes closer than the 'Distance Threshold' this defines what action should be taken: Do Nothing, De-Select Waypoint, Alert, Alarm, Alert & De-Select, Alarm & De-Select.
-
Distance Threshold: Set the distance used in the 'Waypoint Reached Action'
-
Proximity Alerts: Turns Proximity Alerts on/off. These are 'events' which are generated each time a Waypoint becomes closer than the specified Alert Distance.
-
Action: Sets what action should be taken when a waypoint generates a proximity alert: Alert, Alarm, Select Waypoint, Alert & Select Waypoint, Select If Nearer (than currently selected waypoint), Alert & Select If Nearer.
-
Alert Distance: Sets the Proximity alert distance threshold.
-
Alert Waypoint Groups: Selects which groups are included in the Proximity alerts.
NOTE: If you are using a large number of waypoints then the 'Waypoint Reached' and 'Proximity' can occasionally produce some un-expected results. For example, if both the Waypoint Reached and Proximity alerts are active at the same time and the Proximity alert is set to 'Select Waypoint', a vicious circle can occur whereby the Proximity Alert firstly Selects the waypoint then the Waypoint Reached Alert De-Selects the waypoint, and so on. TMJ does try to eliminate this cycle by preventing a waypoint from being re-selected for a period of time, but there may be occasions when this doesn't work quite as expected!
-
-
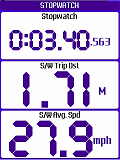
Stopwatch: leads to a submenu for Starting, Stopping and resetting the stopwatch, as displayed on the Text/NAVIGATION and Text/STOPWATCH page. Also has an option to determine what should happen to the stopwatch when the program is exited:
-
Keep Running: The Stopwatch Timer will keep running in the background (the Stopwatch Distance will obviously not update though).
-
Pause: The Stopwatch will pause whilst the program is inactive but will automatically start again (from where it left off) the next time the program is run.
-
Stop: The Stopwatch will be stopped on exit (and will need to be started manually the next time it is needed).
(Note that the Zero-Key Shortcut can give a quicker method for Starting/Stopping the Stopwatch if necessary).
-
-
Capture Geotagged Photo*: if supported by the handset this takes photos using the phone camera and saves them with the date, time and latitude/longitude as part of the filename. Note that on BlackBerry phones this simply invokes the phones built-in camera application, and doesn't create an associated waypoint. (Many recent BlackBerry phones with integrated GPS can automatically geotag its photos, making the TMJ geo-tagging unnecessary)
-
Capture Geotagged Audio*: if supported by the handset this records audio from the phones microphone and saves it with the date, time and latitude/longitude as part of the filename.
-
Current Location: leads to a further submenu for doing various things with the current location (Create New Waypoint, View Coordinates, etc).
-
Location/Track Report: Displays a report on screen summarising the current track data, length, times, speeds, etc. (Report can be saved via the File menu option).
* Notes: These features are primarily designed for recording geodata to assist with creating/editing maps in OpenStreetMap. They are currently experimental and may not work as expected on some handsets. The photo/audio files are saved in the Log folder as specified under Main Menu > GPS > Logging Options > Log folder (the phone will prompt if the folder has not been set). The photo geotagging doesn't add any location information to the files EXIF data (this is not supported by Java).
Main Menu > Clear >>
Leads to a sub-menu to Clear various phone settings:
-
Clear Track: Clears the current track.
-
Clear Section: Leads to a submenu to select which track section should be cleared.
-
Clear Route: Clears the current route.
-
Clear Waypoints: Allows All Waypoints or just individual Waypoint Groups to be deleted from the phone.
-
Clear Map Cache: Clears all data from the map cache, freeing up memory on the phone.
Main Menu > File >>
Leads to various sub-menus for importing and exporting files to/from the phones filesystem.
-
Import Waypoints
-
Ozi: Imports an OziExplorer Waypoint file (*.wpt) from the phones internal memory or flash card and merges it into the selected waypoint group.
-
Export Waypoints
-
Ozi: Exports either the selected Waypoint Group, or all Active Groups to an OziExplorer Waypoint file (*.wpt).
-
OSM: Exports the selected Waypoint Group as an OpenStreetMap (*.osm) XML file, suitable for importing directly into JOSM.
-
GPX: Exports the selected Waypoint Group to a GPX file, suitable for importing into other programs.
-
Import Route
-
Ozi: Imports a Route from an OziExplorer Route file (*.rte) overwriting the current route. (Note: Only the first route within the file is imported).
-
CSV: Imports a Route from a CSV file (Comma Separated Value).
-
Append to Existing: if ticked then the imported route will be appended to the end of the existing one, otherwise the current route will be overwritten.
-
Export Route
-
Ozi: Exports the current Route to an OziExplorer Route file (*.rte).
-
CSV: Exports the current Route to a CSV text file.
-
Import Track
-
CSV: Loads the track from the selected CSV file (*.txt).
-
Ozi: Clears current Track and replaces it with the selected OziExplorer Track file (*.plt).
-
Append to Existing: if ticked then the imported track will be combined with the existing one, otherwise the current track will be overwritten.
-
Export Track
-
Ozi: Exports the current Track to an OziExplorer Track file (*.plt).
-
GPX: Exports the current Track to a GPX file (a standard XML-based file format for storing navigational data).
-
KML: Exports the current Track to a Google KML file (this can then be transferred to your PC and opened in Google Earth).
-
CSV: Exports the current Track to a simple text-based CSV file (*.txt).
-
Export Track Summary: Saves the Menu/Tools/Location/Track Report summary information to a file.
-
Use Unicode: If the handset supports it, this defines whether all file import/export functions should use Unicode format or not. (If in doubt, leave it on).
Main Menu > Settings >>
-
Activity Profile: Leads to a further sub-menu for setting the current Activity Profile:
-
Profile: Selects between a number of preset activities: General, Walking, Running, Cycling, Driving, Sailing, Flying, Custom 1, Custom 2. Each Activity Profile stores different parameters for the following options. Any parameter can be overridden in a particular profile, and will be remembered when the profile is next selected.
-
Reset Profile to Default: Resets the parameters for the selected profile back to the original default values. (Other profiles are unaffected)
-
Show in Shortcut Menus: Shows or hides this profile from the Zero-Key shortcut menus. Useful if you frequently only use one of a couple of profiles, to speed up switching between them.
-
Min Track Distance: Sets a minimum distance between consecutive stored track points.
-
Min Track Time: Sets a minimum time (in seconds) between consecutive stored track points.
-
New Section Time: Defines how frequently a new track section should be begun based on the time standing still.
-
Maximum Track Speed: USE WITH CAUTION!! The Maximum Track Speed limits when the program will add a new point to the track. If the current speed is above this maximum value then no new track points will be added to the track. Its purpose is to reduce the speed-spikes which can appear in the track, particularly when moving slowly (eg walking). So for example if this is set to 5 or 6mph (ie, faster than walking pace) then the track will never store any points that couldn't be achieved by walking . Note that If the speed is consistently higher than this amount an alert message will be displayed on screen.
-
Unpause Distance: Sets the distance that will be used by the Menu/GPS/Auto Un-pause Track Recording function.
-
Default Plan Zoom Level: Sets the initial vector zoom level used on the plan page. Also, when using the Zoom with AutoPan option this setting defines the maximum scaling that will be used. For example when walking or geocaching it might be useful to zoom in a lot so that the immediate surroundings can be clearly seen. When driving, however, it might be more useful to see a wider area.
-
Track Target Speed: This option sets a speed 'threshold' that is used on the TRACK(2) screen 'Distance/Time Travelled above Target Speed' readouts. For example, if when going out for a 30 minute run you actually end up walking part of the way (or almost collapsing with exhaustion!) then this walking time isn't so useful in determining the 'useful' exercise done. The Target Speed readouts only calculate the time/distance achieved above the speed threshold.
-
Route Distance Threshold: Sets the distance that the track is allowed to deviate from the current route before the Recalculate Route function is triggered. Also controls various other routing parameters - essentially the lower the value the more tightly the routing needs to be followed.
-
Routing Method: Set the Routing Method/Provider used for online route calculation (Driving/Cycling/Walking, CloudMade/CycleStreets etc).
-
Vehicle Mass: This is used in addition to the Users Mass setting when calculating the Kinetic Energy readout (Text/Navigation screen) to give the total kinetic energy for the vehicle and occupant.
-
Units: Leads to a sub-menu for selecting between metric, imperial and nautical units:
-
Distance: Metric (metres/km), Imperial (Statute Miles/feet), Nautical (Nautical Miles), Mixed (Statute Miles/metres).
-
Speed: Km/h, Mph, Knots, min:sec/km, m/s
-
Altitude: metres, feet
-
Vertical Speed: m/min, m/s, ft/min
-
Area: Metric (sqm, hectares, square km), Imperial (sqft, acres, square miles)
-
Gradient: Angle, Percent, Ratio
-
Latitude/Longitude: D�M'S", D�M.MMM', D.DDD�
-
Secondary Coordinates: Select a second coordinate system to display on the Text/POSITION page (the Latitude/Longitude are displayed on one line, with the secondary coordinates displayed on the second line): UK National Grid Reference (6 digits), UK National Grid Reference (8 digits), UK Grid Eastings/Northings, UTM (WGS84 Datum), UTM (ED50 Datum). NOTE that the Secondary Coordinates are read-only - new waypoints need to be entered as WGS84 Lat/Longitude.
-
Bearings: display bearings relative to True North or Magnetic North (see next paragraph)
-
Magnetic Variation: if Magnetic Bearings are selected then the magnetic variation is added to the True bearing to calculate the Magnetic Bearing. The Magnetic Variation (or Magnetic Declination) needs to be manually entered here. Note that Menu/Tools/Current Location/Related Websites/Lookup Magnetic Variation can be used to lookup the local variation online (from the US National Geophysical Data Center - NGDC).
NOTE: Unit abbreviations used in TMJ-Mobile are as follows:
-
m (lowercase): metres
-
km: kilometres
-
kmh, km/h: kilometres per hour
-
mph: miles per hour
-
M (uppercase): miles
-
ft: feet
-
NM: nautical miles
-
kts: knots (nautical miles per hour)
-
ft/min: feet per minute
-
m/min: metres per minute
-
sqm, m�: square metres
-
sqft: square feet
-
ha: hectares
-
M�: square miles
-
-
Define Shortcut Keys: The phones Zero [0] key and up to 12 other keys (if available on the handset) can be customised to perform specific functions to allow quick access to commonly-used features. Whilst most of the main keys ([up], [down], [left], [right], [1], [2], [3], etc) are already in use, many phones have several extra keys that might also be available for use by Java and TMJ-Mobile. For example, the Sony Ericsson W910 has several: [C] key, [Call] key, [Volume Up], [Volume Down], [Walkman], [Media 1], [Media 2], [Camera], [Slider Opened], [Slider Closed].
Adding a new shortcut key is a two-step process: 1) Find which 'KeyCode' is generated by a particular keypress by using the Test Keycode function. 2) Define an action to associate with this KeyCode. Available actions are Show/Hide Main Menu, Show Shortcut Menu, New Waypoint Current Loc., Pause/Unpause Track Recording, Toggle Night Colours, Start Slideshow, Start New Track Section, Take Geotagged Photo, Record Geotagged Audio, Send Location Via SMS, Select Nearest Waypoint, Select Activity Profile, Start/Stop Stopwatch, Reset Stopwatch, Mimic [*] Key, Mimic [#] Key, Next Screen, Previous Screen, Lock Keypad, Unlock Keypad, Mimic [Up] Key, Mimic [Down] Key, Mimic [Left] Key, Mimic [Right] Key, Mimic [Fire] Key, Toggle Backlight On/Off, Select Screen, Enable Web, Save Temporary Waypoint.
-
Debug Options (Advanced): leads to a submenu with various advanced options for debugging/troubleshooting any problems with TMJ.
-
Show Debug Info: used for software troubleshooting - displays various internal variables on screen.
-
View Event Log: used for software troubleshooting.
-
Export Event Log: save the Event Log to a file (possibly for sending to us for debugging purposes).
-
Save Settings to Backup File: This option saves all the current TMJ-Mobile settings (except for your TMJ Username/Device Code/Password) to a file, allowing the settings to be quickly restored in the event that the software needs to be reinstalled.
-
Load Settings from Backup File: loads the settings from the backup file created above.
-
Select Map Cache Folder: This is an experimental option that can be useful on recent phones that allow GLOBAL read/write access to the memory card without displaying constant permissions warning messages (BlackBerry and Sony Ericsson JP8 handsets in particular). It allows the map cache to be stored as plain files on the phones memory card, rather than in the limited internal cache that TMJ is otherwise forced to use. This makes it possible to have a virtually unlimited Raster and Vector tile cache, greatly reducing the need to re-download tiles a second time (other than if the underlying map data has changed). Note that files stored in the cache folder should be MANUALLY deleted if space needs to be freed on the memory card - the Menu/Clear Map Cache function has NO EFFECT when using the Map Cache Folder option. Also note that one drawback of this method is if your memory card has a large 'cluster size'. This is the minimum size file that the memory cards filing system can handle, so any files *smaller* than this figure still take up the full space in the cluster. It essentially means that the memory card can fill up a lot quicker than expected (though the massive size of current memory cards does make this less of an issue).
-
Test Web Connection: Attempts to connect to the TrackMyJourney website, useful for confirming whether basic internet access is available.
-
-
More Settings - Opens a separate menu for customising further settings:
-
Set TMJ Device Code: Before TMJ-Mobile can communicate with the TrackMyJourney website your TMJ Username, Device Code and Device Password assigned to your TrackMyJourney account need to be entered here in order to identify the phone to the website. The Device Code and Password can be found on the MY ACCOUNT/SETTINGS/Devices page on the website, or in your original registration e-mail.
-
Screen Height: Enter the exact height (in mm) of the phones screen to enable the Scale readouts to be calculated correctly on the Map/Plan pages.
-
Users Weight: Enter your weight (in kg) to enable correct calorie/energy burn to be calculated.
-
Sound Volume: Controls the volume of all sounds made by TMJ-Mobile. NOTE: this volume is relative to the phones master volume control, so the loudest sounds will only be available if the master volume is at maximum and this value is set to 100.
-
Keylock Timeout: Defines the number of seconds that TMJ-Mobile will wait between keypresses before locking the keypad. (Only has an effect if Main Menu/Display/Auto Keylock is enabled).
-
Map Cache Size (kB): Set the maximum amount of storage that TMJ-Mobile should use for the map cache. Once this limit is exceeded, the least-used maps will be removed from the cache, freeing up space for new maps. (NOTE this has no effect if using the Menu/Settings/Debug Options/Map Cache Folder experimental option, and some phones may override this maximum value with their own lower value)
-
Max Track Points: Some phones only have a limited storage space and can perform unreliably when the track gets too large and unwieldy. This setting is used to prevent the track from growing out of control. When the track exceeds the specified size the oldest 25% or so will be deleted to free up space. (Note that if a complete track record is required then this should be set to a sufficiently high value, or a GPS Log File used instead).
-
Backlight Control Method (Only displayed on supported handsets, and BlackBerrys only have a BackLight Brightness setting here): Different phone handsets have different ways in which their backlight is controlled. This submenu contains various options for fine-tuning the backlight control. The Refresh Time defines how frequently TMJ will 'instruct' the phone to switch on the backlight. Most phones will usually automatically switch the backlight off after a certain time period, so set this option to a slightly shorter period. The Flicker On Refresh option is for older phones (eg SE W800i) that don't properly respond to the 'backlight on' command unless the backlight is currently off. This option briefly switches the light off at each refresh before switching it on again. (Slightly irritating, but the best that can be done on some handsets!). The Force Off option will immediately turn off the backlight when the 'Backlight On' option is disabled. Again, this is for use on older phones and should generally not be needed. (Beware that this opton can suddenly make the screen go black, making it difficult to control any other functions - use with care!!). The Backlight Brightness sets the brightness of the screen (only has an effect when 'Backlight On' is enabled) - it may not have much noticeable effect on older phones.
-
Alert at Each Routepoint: Selects whether the phone should display an alert when each subsequent Routepoint is reached.
-
Include Gradient in Calorie Calculations: When enabled, the energy calculations used in determining the calories burnt when walking, running, cycling, etc will also take into account whether the activity was ascending or descending in altitude. For example, running uphill requires more energy than on the flat, whereas cycling downhill requires a huge amount less. Note that these extra gradient calculations only serve as an estimate - sufficient for comparing separate runs/walks etc, but shouldn't be taken as a precise measurement.
-
Confirm on Exit: Displays a confirmation message when exiting the program. (Note some phones have a key that forces an application to exit, which can't be overridden by this option).
-
Show Confirmation on Clear Track/Route etc: When enabled, a Confirmation Message will be displayed when clearing the Track, Route, Waypoints, etc, to help avoid accidental deletion of these items (which cannot be otherwise undone).
-
Enable Vector Maps: The vector maps are only available in the Full version of TMJ-Mobile. Unticking this option will remove all reference to them from the menus, which may be easier if you are just using the Basic version.
-
Main Menu > Help
Leads to a sub-menu for controlling communication with the TrackMyJourney website:
-
Getting Started: Displays some basic information on Key usage, GPS connection and Web Uploading
-
Online Support: Opens an online mobile version of the TrackMyJourney support pages in the phones browser.
-
TMJ Website Login: opens the TrackMyJourney website in the phones browser (if supported by the phone).
-
About... Shows program version information. Also shows a list of available serial ports for use in the GPS/Enter Manual Connection URL function.
Main Menu > Exit
Quits the program.